Download PS2 BIOS Files (USA, Japan, Europe, China) All Regions
On this page, you can easily browse and download every official PS2 BIOS file available on our site. Whether you’re looking for BIOS files from PAL territories, Japan, the USA, or other regions, you’ll find the complete collection listed below.
The PS2 BIOS (short for Basic Input/Output System) is a small but essential piece of software stored on a chip inside the PlayStation 2 console.
In recent years, an online persona called SmartSchoolBoy9has drawn significant concern from parents, educators, and safeguarding organisations
Wheon Grand Theft Auto is a fan-driven adaptation and reimagining of the famous Grand Theft Auto series.
Its main job is to initialize the hardware (like the CPU, graphics, and controllers) when the system is powered on, and to load the operating system or game from the disc, hard drive, or memory card.
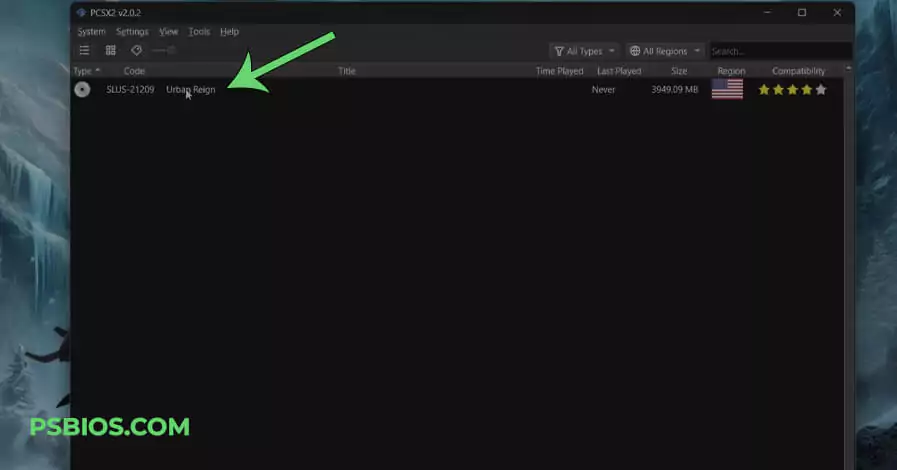
When you use a PS2 emulator (such as PCSX2) on a computer, the BIOS file is required because it mimics the original PlayStation 2 firmware, allowing the emulator to behave like a real console. Without it, the emulator can’t run PS2 games.
The BIOS is region-specific, meaning there are different versions for NTSC-U (USA), NTSC-J (Japan), and PAL (Europe and other regions), and some games will only work correctly with the matching BIOS.
Download PS2 BIOS Files for All Regions – USA, PAL, NTSC, NTSC-J
Click on the “Download” section in the menu to find the latest version of the emulator.
Select the appropriate download link for your operating system (Windows, macOS, or Linux).
Click the download button to get the installer file. Ensure you download the latest stable version for the best experience.
Make sure your computer meets the minimum system requirements to run PCSX2 smoothly. Generally, a modern CPU with at least 4GB of RAM and a dedicated graphics card is recommended
How To Install and Setup PCSX2 BIOS in 2025
Once you have downloaded the PCSX2 installer, follow these steps to install it on Windows.
Note: Please see the attached screenshots for a better understanding
1.Install PCSX2: Open the installer, follow the instructions, and choose default components unless you have specific preferences.
For macOS: Open the downloaded DMG file, drag the PCSX2 app into your Applications folder, and complete the installation.
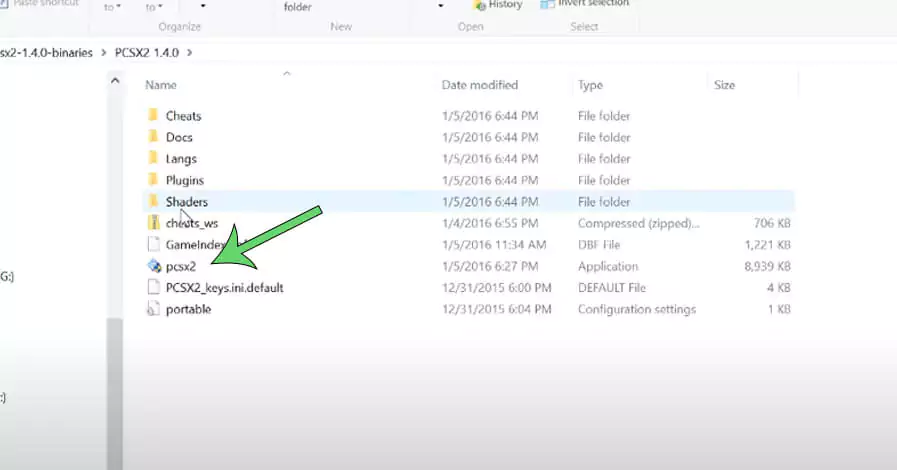
2. Obtain PS2 BIOS: Using the BIOS file links on our website, kindly download any PS BIOS of your choice. Place the BIOS files in the BIOS folder of the PCSX2 directory.
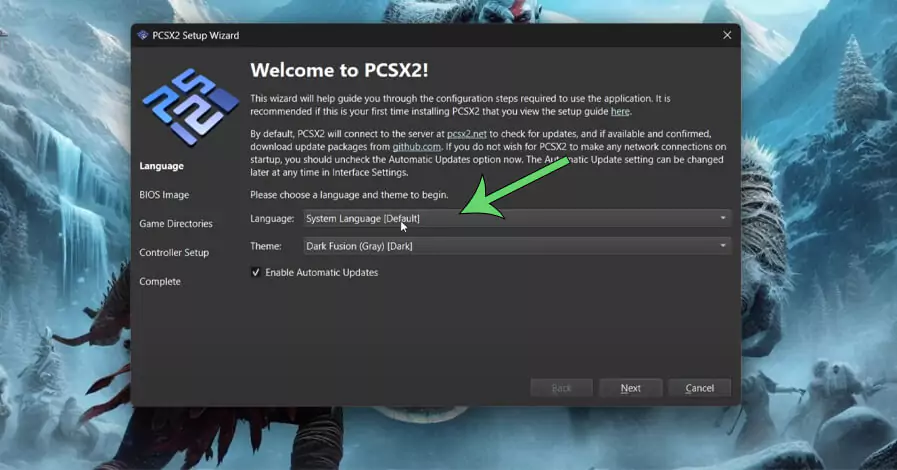
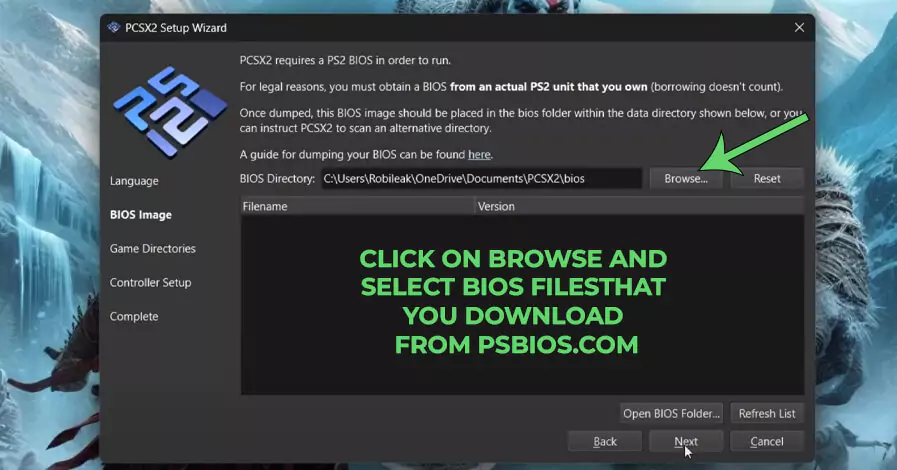
3. Configure PCSX2: Launch PCSX2, follow the Setup Wizard, select your language, browse and select your BIOS directory, and proceed with the default settings.
Select Language
Select BIOS Files
4. Set Up Game Directory: In the game directory setup, browse and select the folder where your PS2 game ISOs are stored, then click Next.
Select ISO files Directory
Supported formates for dumps include:
.bun/.iso (ISO Disc Images)
.mdf (Media Descriptor File)
.chd (Compressed Hunks of Data)
.cso (Compressed ISO)
.zso (Compressed ISO)
.gz (Gzip Compressed ISO)
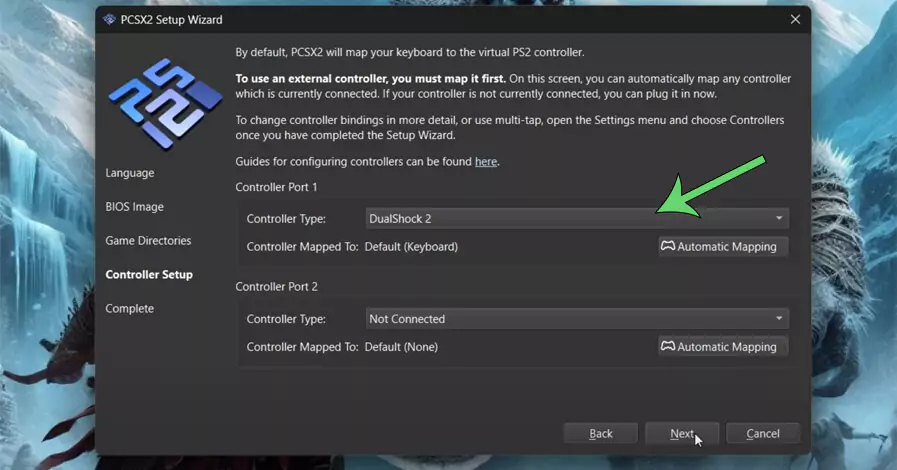
5. Configure Controller Settings: Click Configure under Controller Settings and set up your controls for the keyboard or any connected game controller.
PCSX2 Controller Settings
6. Complete the Setup: Click Next until the final screen, then click Finish to complete the installation.
7. Play Your Games: After completing the setup, all your games in the directory will appear on the PCSX2 screen. To play a game, simply double-click the game you want to start.
Alert: If you want to add more ISO games later, place the new ISO files in the game directory you set up earlier. The new games will automatically appear in the list the next time you open PCSX2.
Additional Tips:
Ensure your graphics drivers are updated for optimal performance.
Adjust settings in the Config menu for better gameplay.
Check the PCSX2 compatibility list for game-specific performance information.
How to Setup PS2 BIOS on AetherSX2 Emulator for Android
Using the PS2 BIOS file is quite straightforward on Android, here’s a simple step you can follow below.
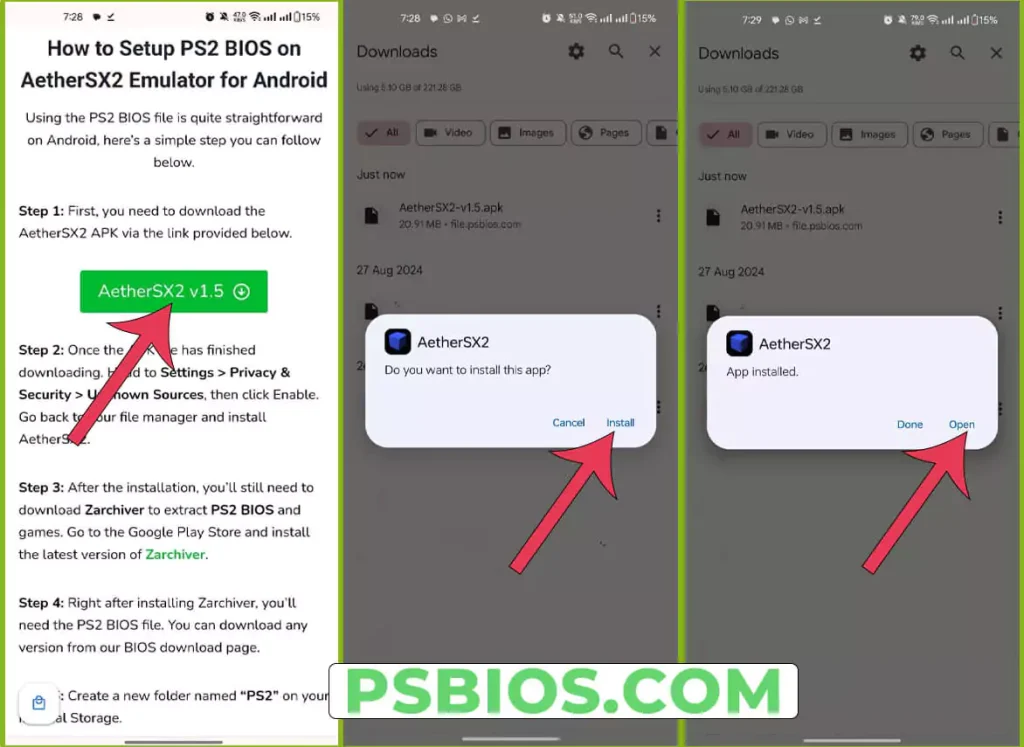
Step 1: First, you need to download the AetherSX2 APK via the link provided below.
Step 2: Once the APK file has finished downloading. Head to Settings > Privacy & Security > Unknown Sources, then click Enable. Go back to your file manager and install AetherSX2.
AetherSX2 Apk Installation
Step 3: After the installation, you’ll still need to download Zarchiver to extract PS2 BIOS and games. Go to the Google Play Store and install the latest version of Zarchiver.
Credit: PlayStore
Step 4: Right after installing Zarchiver, you’ll need the PS2 BIOS file. You can download any version from our BIOS download page.
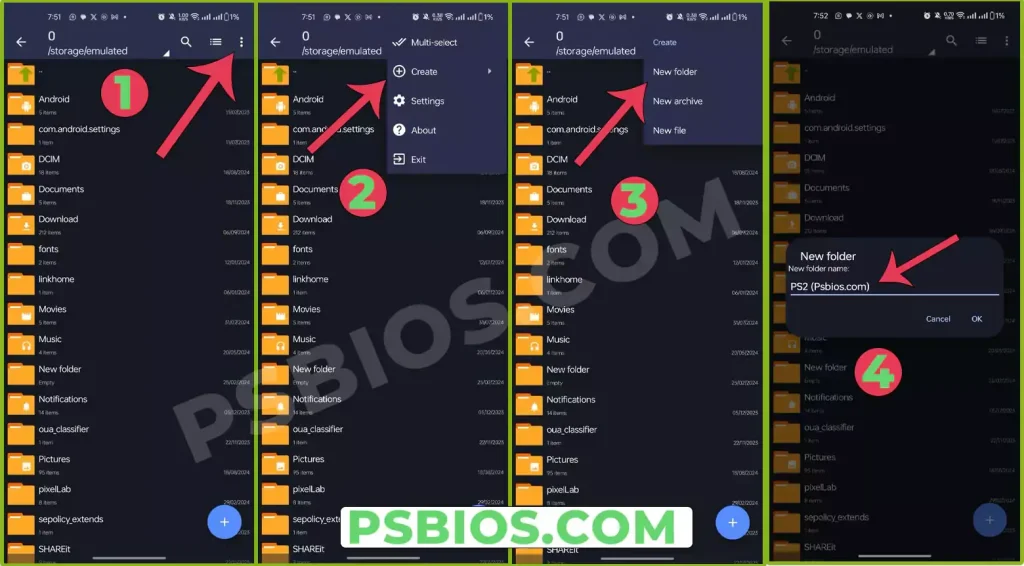
Step 5: Create a new folder named “PS2” on your Internal Storage.
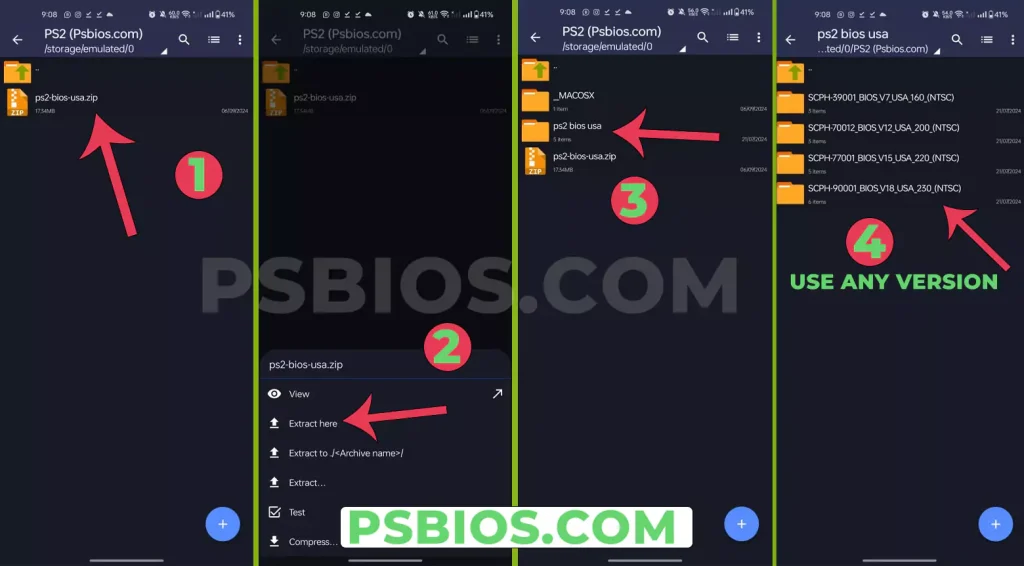
Step 6: Open Zarchiver, then extract the downloaded PS2 BIOS file to the “PS2” Folder you created on your Internal Storage.
Step 7: If you have any PS2 games, you can as well move them to the “PS2” folder. But if you need to download, here’s an article where you’ll find the best websites to download PS2 games.
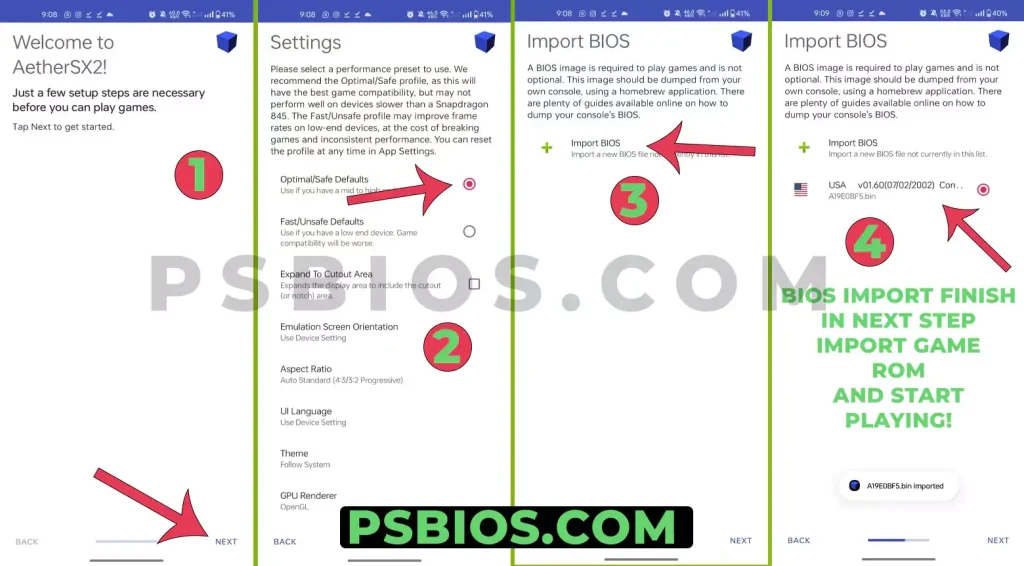
Step 8: Launch AetherSX2, and click on Next, till you get to the Settings Page.
Step 9: Depending on your device specifications, two options are available. You’ll see Optimal/Safe Defaults and Fast/Unsafe Defaults. Select Optimal/Safe Defaults, and click on Next.
Step 10: On the page that says Import BIOS, click on the + (Import BIOS), Select the BIOS file from the “PS2” folder on your Android device, and click Next.
Step 11: Under Game Directories, click the + icon and add any PS2 ISO game file on your device. You can add a Single Folder or add your Internal Storage to scan all PS2 games on your Android device. Click on Finish, you should see all available games on the AetherSX2 emulator.
Steps to Use PS2 BIOS on PC and Mobile
PS2 BIOS
Using a PS2 BIOS is an essential step when configuring an emulator—such as PCSX2 (PC) or AetherSX2 (Mobile)—to play PlayStation 2 games. The BIOS enables the emulator to replicate the real PS2 hardware.
Below are step-by-step instructions for PC and mobile setups.
For PC (PCSX2 Emulator)
1. Download the BIOS file for your region
Choose the correct region (USA, Europe, Japan, etc.).
Download the PS2 BIOS from a reliable source.
Make sure it’s legal in your country and that you own the original PS2 console.
2. Extract the BIOS files
If the file is compressed (.zip / .rar), use WinRAR or 7-Zip to extract it.
Store the extracted files in a safe location.
3. Install and open PCSX2
Download PCSX2 from its official site.
Install and launch the emulator.
4. Go to BIOS settings
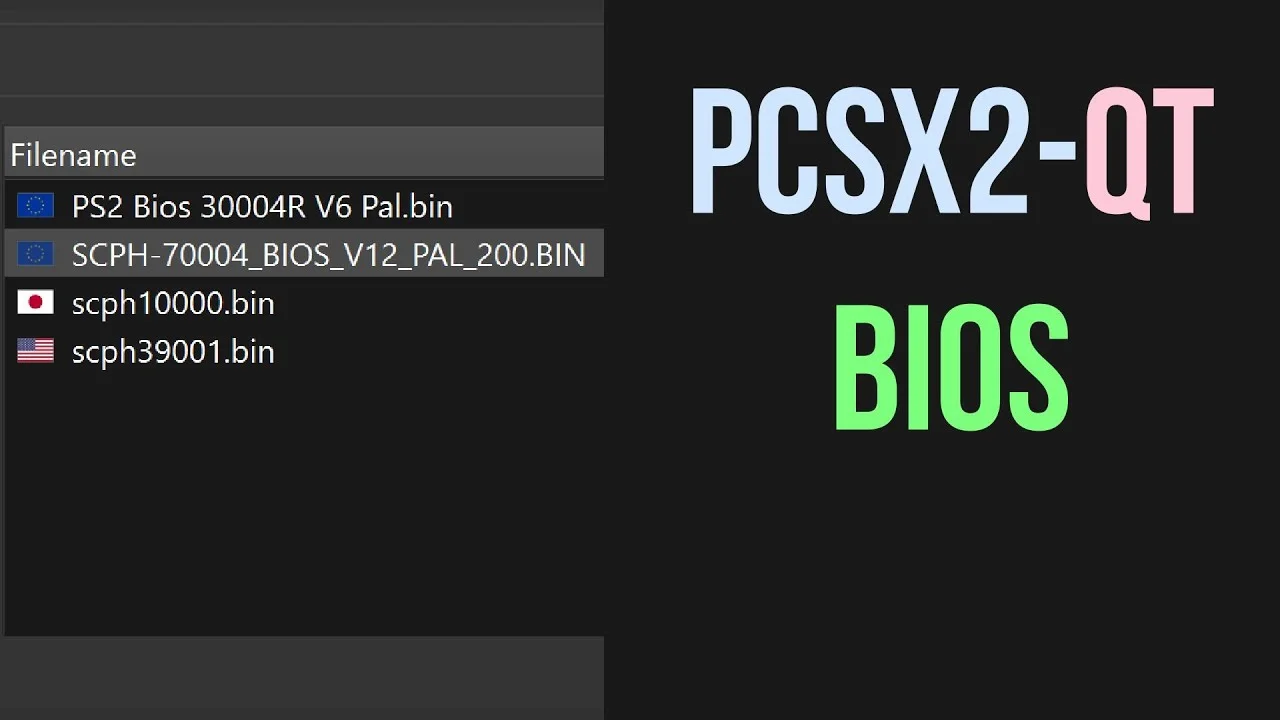
In PCSX2, go to Config → BIOS/Plugin Selector.
Select Browse to locate your BIOS files.
5. Select and save
Pick the correct BIOS for your region.
Click Apply or OK to save settings.
6. Restart emulator & play
Close and reopen PCSX2.
Load a PS2 ISO or disc and start playing.
For Mobile (AetherSX2 Emulator)
1. Download the BIOS file
As with PC, choose the correct region.
Download it from a trusted source.
On mobile, the file will likely be in your Downloads folder.
2. Install AetherSX2
Get AetherSX2 from the official website or a safe APK repository.
Open the app.
3. Extract the BIOS file (if zipped)
Use a file manager app (like ZArchiver) to unzip the BIOS file.
4. Load BIOS into AetherSX2
Open AetherSX2 → tap Settings → BIOS.
Navigate to the folder with your BIOS files.
Select your BIOS file.
5. Save settings & play
Tap Save/OK.
Load your PS2 game ISO and start playing.
Common PS2 BIOS Errors and Fixes (PC & Mobile)
PS2 BIOS
When setting up PCSX2 on PC or AetherSX2 on mobile, the PS2 BIOS is essential for running games. However, many users face errors, crashes, and performance problems during setup.
Below, you’ll find a comprehensive list of issues you might encounter and exactly how to solve them.
1. BIOS Not Found
Cause:
The emulator cannot locate any BIOS file in the selected directory.
BIOS may be missing, compressed, or placed in the wrong folder.
Fix for PC (PCSX2):
Make sure you have a valid PS2 BIOS for your region (USA, Europe, Japan, etc.).
If the BIOS came in .zip or .rar format, extract it using WinRAR or 7-Zip.
In PCSX2, go to Config → BIOS/Plugin Selector.
Click Browse and select the folder containing the BIOS files.
Save and restart the emulator.
Fix for Mobile (AetherSX2):
Download and extract the BIOS using ZArchiver or your phone’s file manager.
Open AetherSX2 → Settings → BIOS.
Navigate to the folder with the BIOS files.
Select the BIOS and save settings.
2. No BIOS Configured
Cause:
You downloaded the BIOS but never told the emulator where it is.
Fix (PC):
Go to PCSX2 Config → BIOS Settings and set the BIOS directory.
Save changes and restart.
Fix (Mobile):
Open AetherSX2 → Settings → BIOS, select your BIOS file again, and confirm.
3. Wrong Region BIOS
Cause:
BIOS region doesn’t match your game’s format (NTSC-U, PAL, NTSC-J).
This can cause black screens or game incompatibility.
Fix:
Use a BIOS that matches the game’s region:
NTSC-U (USA) → USA BIOS
PAL (Europe) → Europe BIOS
NTSC-J (Japan) → Japan BIOS
4. Black Screen on Startup
Cause:
Corrupt BIOS file.
Incompatible ISO.
Improper emulator configuration.
Fix:
Test another BIOS file for your region.
Try running a different PS2 game ISO to check if the problem is game-specific.
Reset the emulator to default settings.
Update to the latest emulator version.
5. Slow Performance or Lag
Cause:
BIOS is fine, but system settings are too demanding for your device.
Fix (PC):
Reduce internal resolution in Graphics Settings.
Disable anti-aliasing and anisotropic filtering.
Switch to Direct3D11 or Vulkan renderer.
Fix (Mobile):
Lower rendering resolution in Graphics Settings.
Turn off texture filtering and enhancements.
Use Vulkan for better performance.
6. BIOS Not Loading on Mobile
Cause:
BIOS file stored in a restricted or unreadable folder.
Fix:
Move BIOS to Internal Storage → Documents or a main folder.
Grant storage permissions to AetherSX2 in phone settings.
Re-add the BIOS in emulator settings.
7. Emulator Crashes When Loading BIOS
Cause:
Damaged BIOS file.
Outdated emulator version.
Incompatible device hardware (mainly mobile).
Fix:
Redownload the BIOS from a safe source.
Install the latest emulator update.
On mobile, try a different AetherSX2 build optimized for your CPU.
8. “This BIOS is Not Compatible” Message
Cause:
BIOS is outdated or modified in an unsupported way.
Fix:
Use a proper, unmodified BIOS dump from your own PS2 console.
Always pair BIOS with an updated emulator.
9. Stuck on PS2 Logo or Browser Screen
Cause:
Emulator booting without a game loaded.
Fix:
Make sure you load a valid PS2 game ISO before starting.
In PCSX2, select System → Boot ISO (fast) instead of full boot.
10. Missing BIOS Files After Restart
Cause:
BIOS directory was changed or emulator lost permission to access it.
Fix:
Reconfigure BIOS path in settings.
On mobile, ensure the BIOS is stored in internal memory, not an SD card that’s been removed.
Preventive Measures to Avoid PS2 BIOS Problems (PC & Mobile)
When setting up a PS2 BIOS for use with emulators like PCSX2 on PC or AetherSX2 on mobile, prevention is always better than fixing problems later. Many of the common issues people face, such as “BIOS not found” errors, crashes, or compatibility problems, can be avoided entirely by following some careful practices right from the start.
One of the most important preventive measures is to always use a legally obtained BIOS. The safest and most reliable way to do this is to dump the BIOS from your own PlayStation 2 console using proper tools. Downloading BIOS files from unverified sources is risky — they may be corrupted, outdated, or even modified in a way that causes crashes. Plus, using a BIOS you do not own can lead to legal issues depending on your country’s copyright laws.
It’s also crucial to ensure that your BIOS region matches the games you plan to play. PlayStation 2 games are region-locked, meaning NTSC-U (USA), PAL (Europe), and NTSC-J (Japan) games are designed to work best with a BIOS from the same region. While some games might still load with a different BIOS, mismatches often lead to black screens, freezes, or strange bugs. Deciding your main game region before obtaining your BIOS will save you from future frustration.
Proper organization is another key factor. Store your BIOS files in a dedicated folder — for example, Documents/PS2_BIOS — and avoid mixing them with your game ISOs or other emulator files. On mobile, keep your BIOS in internal storage rather than an SD card, as SD cards can lose permissions or be removed, breaking the emulator’s link to the BIOS. Once the BIOS is in place and configured in the emulator, it’s best not to move or rename it, as doing so will cause the emulator to lose track of the file.
Before loading your BIOS into the emulator, make sure it’s fully extracted from any compressed format like .zip or .rar. Loading a BIOS directly from a compressed archive is one of the most common causes of the “BIOS Not Found” error. On PC, you can use WinRAR or 7-Zip for extraction, and on mobile, ZArchiver works well. Once extracted, it’s wise to make backups. Keep at least two copies — one in your main storage and another on an external USB drive or cloud storage service like Google Drive or Dropbox — so you’re never at risk of losing your only BIOS copy.
Finally, keep your emulator updated. Both PCSX2 and AetherSX2 are actively improved over time, and newer versions often include better BIOS compatibility and performance fixes. Before starting gameplay, it’s a good idea to do a quick BIOS test boot without a game loaded. If the BIOS loads into the PS2 system menu without any errors, you can be confident your setup is correct.
By following these preventive measures — legal acquisition, region matching, careful organization, proper extraction, regular backups, and keeping your emulator up-to-date — you can avoid almost all BIOS-related problems and enjoy smooth, uninterrupted PlayStation 2 gaming on both PC and mobile.


 PS2 BIOS